Everyone has a story to tell, here's mine sprinkled with some creative projects along the way.
Thank you for stopping by and I hope you come back again.


Wednesday, April 30, 2014

That Smile layout *Inspired By Stamping*

Hello there crafty friends. I know this project is a bit different from all the floral themed projects you've seen in this blog this month. I have loved using the new releases but I was also itching to use some bold colors on my next project and for that I veered slightly away from the floral accents. Instead, I had put together a layout featuring "arrows" and LOTS of it! Thankfully IBS is so versatile in it's stamps sets that I was able to pull out different sets to complete my "arrow" designs.
that smile layout
As I was going through some pictures recently, I came across these four images of my daughter hamming it up in front of the camera while we were enjoying a day at the beach a few years ago. I loved her happy disposition and it reminded me that there's never any stress in life that can't be handled with a little laugh and a whole lotta smiling!
that smile layout-001
Because the design of the page is mainly geometric, I decided to play with the arrow stamps to create two blocks that added some design to the page. I also made the ends of the arrow to point to my photos directing the viewer's eyes to my images. After that I added one of my favorite sentiments from the new Sweet Pea stamp set which was released last month.
that smile layout-002
With a some papers, twine and stickers to add dimension, the page was complete. For my stamped arrows, I got the color combination from my daughter's bathing suit, making the arrows blend well with the photos.
that smile layout-003
I initially added white paint to the edges of my background papers but after some thought, I decided to stamp some more of the arrow design (with red ink) on the edges of my orange paper to give it more design and interest.
that smile layout-004
I added the round circles with foam adhesive to give it a little bit of a boost. I also placed them in three different parts of my page so that I am able to create a visual triangle with this project.
So there you have it. I hope this project inspired you to gather some of your similar stamps and put them together to create your own background paper.
Happy Creating,
Grace
 
Inspired-by-Stamping_thumb.png
Stamps- Sweet Pea,Inspired By Stamping
Arrows ,Inspired By Stamping
Background Basic Lines ,Inspired By Stamping
Chalkboard Birthday ,Inspired By Stamping
Papers and stickers- BoBunny
Twine- The Twinery
Pen- Millennium, Zig
Others- Paint, Ink pads, Adhesive

Tuesday, April 29, 2014

Sending you sunshine card *Inspired By Stamping*

Hello crafty friends. 
Today's share is a card created with some stamps from Inspired By Stamping

Sending you card
I started this card by coloring the floral stamp. I am admitting that i'm not the best 'colorist' out there so I opted to try it out on a tag first versus on my actual card. Just in case I didn't like the result. I used some colored pencils from Faber Castell to bring some color to the stamped image. 

I then stamped the frame on another coordinating paper, cut it out then adhered it to my card with foam adhesive. I decided to heat emboss the sentiment on yellow paper to make it stand out against all of the background.


What technique have you tried lately that you were super afraid of?

Till next time,
Grace

Monday, April 28, 2014

Card set with Animal trims *Ribbon's Unlimited Inc.*

Hello Ribbon’s Unlimited Inc. friends. Today I’m sharing a card set that I had created inspired by some of the fantastic animal print trims Ribbon’s Unlimited Inc. offers.
I wanted the ribbons and its design to stand out so I opted for a plain (but texturized) background and added a few stickers just to complete the sentiment.

Instructions:
1. Gather your supplies. I started with three white card base, picked some cardstock that will coordinate well with my ribbons, a sticker sheet to match the theme, buttons, twine and an embossing folder.
2. First I cut the cardstock pieces 1/8” smaller than the card base (my card base are A2 sized which is 4 ¼ x 5 ½”) I ran all of them through my Cuttlebug with a striped background embossing folder from Darice. The striped background reminded me of the lines on a cage that we normally see in a zoo.
3. Next I adhered the cardstocks on the card bases and then matched them with the ribbons that I had. 

4. I then cut a slit on the bottom fold of the card so that the ribbons can slip through it to be adhered on the inside of the card. I also tied two buttons around the trims with twine.
5. I layered some stickers, another button with twine and a sentiment on the top of the page to finish off the cards.
I kept the design of the cards pretty similar to one another which made creating this set super easy and fast.

Here’s another look at the individual cards… 


So there you have it. Who says that you can’t have fun with animal prints? With these cards, you can help but get a little ‘wild’!

Happy Creating,
Grace

Supplies Used:
Cardstock- WorldWin Papers, Bazzill
Stickers- (sentiments) SRM Stickers; (others) SEI
Buttons- Foo fala
Twine- Doodlebug Design Inc.
Embossing Folder- Darice
Scallop die- Spellbinders

Frame punch- EK Success

Friday, April 25, 2014

Welcome Spring! layout *Inspired By Stamping and Die Version Blog hop*


Hi everyone! Welcome to the Inspired By Stamping and Die Versions Blog Hop.  Twenty two talented designers have united to celebrate the new season and shake off the malaise of a snowy winter. Yay!!! Inspired by Stamping, which designs and manufactures the highest quality of photopolymer stamps that bring superior stamping to all crafters, has teamed up with Die-Versions, makers of low profile metal dies which works with virtually every machine out there and cuts through most materials, to create this special eye candy of Spring themed projects.

One lucky "hopper" will get a total prize package of $100 in gift certificates, a $50 gift certificate from Inspired by Stamping AND Die-Versions, so you can stock up on some awesome products that both of these companies have to offer.

For your chance to win the grand prize, visit all of the participating blogs, leaving a comment at each, then leave a comment telling us what you like the most about Spring at the Inspired By Stamping blog. All comments entered between now and April 28th at 10 pm (Pacific time) will be eligible for the grand prize. We also encourage you to leave a comment on each of the designer’s blogs along the way, I’m sure they would appreciate the love.

Here's my contribution to the hop...

Welcome Spring! layout

Here's a couple of "behind the scene" photos while I was creating my layout...

When I received the background die from Die Versions, I was very impressed at how easy it was to create this intricate dot design. I liked it so much that I thought it would be fun to use it as a mask on my background page. I created the image on plain cardstock and then used that as a stencil over my pattern paper.

To add some "spring" flowers to my page, I used the Daisy stamp from Inspired By Stamping to create my layered floral embellishments. This is a great technique to use up scrap paper cause it adds some interesting look to your stamped images.

To finish off my layered flowers, I handcut them then layered them over each other. I added a button with twine threaded through it as a finishing touch.

I even used the misted cardstock on my page by punching out a tag from it which I layered over another plain cardstock. I loved the layered look of it.

I used the "remember" die to put on the top of my photo. It was a great little accent on the top of the page.

I decided to add a really cool quote on my page so I used this stamp set, cut out into strips then added it to the page. 

And here's the final page again....

and here are some close up shots...


Your next stop on the hop is Leah's blog  and if you ever get lost in the hop you can always go to Die Versions blog and Inspired By Stamping blog for the complete order list.

Till next time,
Grace

Monday, April 21, 2014

Easter 2014

Happy Monday. Hope you all had a great Easter weekend. 

We had a mix of fun and not so fun that went on in our home. On Friday, after school the kids colored their eggs. I love how the kids are never too old for this fun tradition. Here are some photos...


The thing I love about their age is that I can help set up the activity and then watch from the couch. They know the drill and have kept the mess to a minimum. Once in a while I think about how our family dynamics would be this time next year when the baby comes. It makes me enjoy my children's independence a little more, especially knowing that it's going to be all "hands-on" again soon. :)

Here's some of the finished eggs. Maddie took more time in making her eggs have a bolder color that Marcus did but I really like how the vinegar makes the eggs pop versus just water.

Right before dinner started on Friday, Marcus started complaining of stomach pains. After a sleepless night tending to him we suspected he was hit with either some kind of food poisoning or stomach flu. We were suppose to host Mitch's friend and his kids for dinner that night but had to cancel because Marcus wasn't feeling well and we weren't sure if what he had was contagious. Thankfully on Sunday morning he felt better and we were able to go on with our day's planned events.

This past week was a Spring break for me so I had sometime to really plan out our Easter outfits. I love this little tradition with my family. This is the only time in the year that I really make sure we coordinate with our outfits. You can see 2011 outfit here and 2012 here

As you can see Maddie and I had matching skirts. I had sometime to sew some simple maxi skirts this week and that's where I pulled our family color scheme. I already had a yellow top so I went with that as the main color that will go across the board. I went to the thrift store later in the week and scored Mitch's tie, Marcus' shirt and Maddie's shirt and jacket. I was so excited when I scored Maddie's lilac jacket as it is a Gap brand and I only paid $2.50 for it. Don't you just love bargains? 

Maddie was the only one that had a purple so I rummaged through the belt section of the store and found a purple floral belt that I was able to incorporate with my outfit. 

Can you tell these kids were told to pose like this? I wonder for how long I can incorporate my need to pose people onto my children before they start complaining?


Here's me and my "mini" me. She's definitely a treasure and I am so blessed to call her my sweet daughter.

After church we had some friends over for the traditional Easter dinner of ham, potatoes and green beans. Then we headed to their home for an egg hunt and some yummy dessert. 


So that's how our weekend rolled. The kids don't have school today and we were planning on enjoying the lovely day outdoors but it seemed like Marcus' stomach flu went back and I'm back to "nurse" duty. Well at least our Easter Sunday went off without a hitch. 

Hope you all have a great week. 

Till next time,
Grace

Wednesday, April 16, 2014

Altered Wooden Clip frame *Inspired By Stamping*

Looking for a quick Mother's day gift for next month? How about altering a wooden paper clip with some beautiful products from Inspired by Stamping?
 
thank you altered paper clip
I've had this plain wooden paper clip for over four years now. It's been sitting on my craft desk and I use it to tuck any notes that I wanted to remember later on it. But after receiving the new release stamps from IBS, I was encouraged to finally "pretty" up this plain clip. I am so happy with the result that I've actually moved this item from my crafty desk to one of my side tables in my living room. The IBS products really makes it beautiful and I'm proud to display it along with some favorite pictures of my children.
thank you altered paper clip-003
I first took out the springs from the middle of the clip, then I painted the pieces white so that it will have a clean foundation. I measured the outside part of the clips and covered it with papers from the Vintage Floral Paper pad. I decided to use my Mod Podge on this project to make sure that the papers adhere well onto the wood and that it will have a clean finish as well.
thank you altered paper clip-001
Next I used the Fancy Labels 2 Die to create my layered title block. I inked the edges of the smaller piece to separate it a little from the larger paper. I added a floral background on the block before stamping the sentiment. Both the flower and sentiment stamps are from this set...
clip_image008_thumb.jpg
thank you altered paper clip-002
I added some twine and rhinestone to the title block before adhering it (with foam adhesive) onto the paper clip. I wanted to add some more color to the project so I adhered three peach carnations to the edges of the title block.
So there you have it. I was able to create this project in less than 30 minutes and I'm sure it would take less if I didn't have to paint the clip. I hope this inspired you to put your beautiful IBS stash into creating projects that will beautify your home even further.
Happy Creating,
Grace
 
clip_image006_thumb.jpg
Stamp set- Sweet Pea,Inspired By Stamping
Paper pad- Vintage Floral, Inspired By Stamping
Die cut- Fancy labels 2 die, Inspired By Stamping
Flowers- Peach Carnations, Inspired By Stamping
Others- Wooden Paper clip, white paint, adhesives

Monday, April 14, 2014

Cramming it all in here

Hi friends. 
So I know that this blog has been loaded with just crafty projects lately. It's been a very exciting few months for our family and if you have me as a friend on Facebook, you know that we are expecting our third child in September. We are crossing our fingers we will know if we are having a girl or a boy sometime very soon. 

So with that, I have been hit by morning sickness BIG TIME! I had a hard time for the first trimester. If I was not sick, I was super tired and sometimes I was both. Yuck! To top that, I was still trying to manage being a mommy, a crafter, a business owner and a student. Yeah, not so fun! That's the reason why this blog has been neglected. I have learned that when you are trying to survive, you put energy in the most important stuff and at the end of the day, sadly, blogging wasn't part of the list. 

Anyways, since we are passed the first trimester, I'm feeling back to my old self again and so I finally decided to go through some pictures from the last few months and share with all of you what we've been up to. Some are a little grainy since they were taken with my little IPod touch but I still count them as priceless as they were evidences of memories I don't want to forget. 

January was a rough one for us as my dad was admitted to the hospital for breathing problems in the middle of the month. His health quickly turned for the worst and there was even a scary time when the doctor said that if we wanted to see my dad alive, we would have to travel right at that second. Thankfully we had prayers being said for him in all corners of the world and he lived to tell his tale. He was in the ICU for over a month and is still connected to respirator to this day. Despite the health challenges, he is making progress. Just a couple of days ago my mom reported that he was able to sit up. It's a big leap being that he's been lying on a hospital bed for almost 3 months now. 
(picture was taken of me and my dad in the summer of 2011) 

On the last day of January we had a good snow storm. The following day was a Saturday and the family decided to test out the new sleds we bought at Costco. We went to a nearby park and when we got there it seemed like every single family in the area had the same idea. Mitch and the kids still managed to find a good spot to slide down from. I took these photos in the first five minutes of them sledding and then I went back to the truck to keep warm and refrain from fainting or worst, throwing up! 


February was also the month where Marcus presented his Science fair project this year. This is his last one as an elementary student and he chose rockets. He picked three kinds of rockets that he will make and test which one had the better engine. 

Here he is during the actual fair. He didn't place (he was bummed about it) but I believe it's because he didn't even bring his rockets to show. I wanted him to take responsibility for this and he decided (against my persistent advice) to leave the rockets home. I think a little disappointment doesn't hurt a kid, especially if he realizes he would've made a better choice with it.

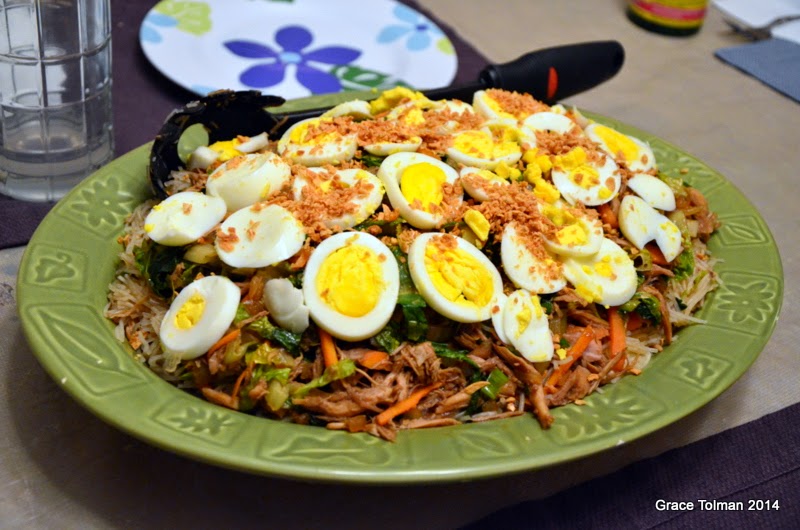
One thing I've noticed with this pregnancy was that I was craving a lot of Filipino food. It was very hard to fill that craving as there are no Filipino restaurants in the area. Luckily my mom and dad gave me enough recipes and knowledge to make my own at home. During those times where I had a burst of energy (or I just couldn't stand not filling the craving) I'd cook something. This Pansit (Filipino noodle dish) was made sometime in February. 

A good friend of mine introduced me to these mints. I told her of my struggle with the nasty "pregnancy" after taste and how Tums just didn't seem to calm my stomach down. She gave me some of these mints and from then on, I was hooked! Apparently these are "British" mints. They are bigger than a lifesaver and have quite a strong mint flavor. It was one of my "survivor" necessities during the first trimester. I couldn't leave the house without it. At one point, I had a roll in my purse, by the computer, on my craft table, on my nightstand and any other place in the house where I might need to quickly pop them in my mouth. Thanks Heather, you and these mints were a lifesaver. :)

Also in February we got our first glimpse of baby #3. I had my first ultrasound at about 10 weeks and this is our first picture of the baby. 

In March, the cub scouts in our stake had their annual Pinewood Derby car race. Mitch and I let Marcus design his car. We are slowly giving him more opportunities to make choices and also accept the consequences of them. Our big lesson for him these days is "taking ownership" of things and choices. We want him to be ready for middle school. Yikes, that's in the fall! 

Anyways despite the lack of creativity in his car design and very little effort in painting his car, he still managed to rank second in all of his races. At the final scoring, he was in the middle of the pack.


After the race we treated him (and the whole family) to dinner at Steak and Shake. The kids love that place cause of the shake and as you can see in the photos, it's a pretty good size treat.


Also in March, Maddie started borrowing kid cookbooks at the library. I'm not sure why but I'm excited for her and her new found enthusiasm for cooking and making things in the kitchen. Who knows maybe she'll be the next chef in the family (My dad was a professional chef for many years). For our Family Home Evening treat this one particular Monday she (with some help from me) made a no bake cheese cake. We had to substitute some of the ingredients as we didn't have them on hand. So instead of a berry topping, we used fresh mangoes and a little bit of my homemade pineapple/zucchini preserves. It sure was delicious! 


The kids had their Spring break in March and one of the things we did was walk (2 miles round trip) to a local duck pond. We brought all of our old crackers and chips to feed to the ducks. It seemed like the ducks and geese haven't been fed in a while cause they were all excited to see Marcus and Maddie throw the crackers their way. 

I started feeling well about halfway through March and I had more energy to be a "better mom" to the children. I know that I've neglected them in one way or another in the past few months so to "redeem" myself, I searched Pinterest for cool activities to do for General Conference weekend. We did conference cash where the kids got to earn paper money during the sessions if they were listening, participating in the singing parts and being reverent. Mitch and I were in charge of handing them out and if we found them not following the rules, money was taken away as well. I went to the dollar store to grab a few items but as you can see in this photo, I just went through my home and tried to find what items I can put in the "conference store". Most of them were food but they did save up enough "cash" to get the big ticket items like a bug catcher bought at the $ store. 

I also found this cool idea where the kids can move the picture of the apostle behind the paper podium so that they can familiarize themselves to who is speaking at that time. I only found pictures of the presidency and quorum of the 12. I didn't have a big enough egg carton to name all the seventies and the other general authorities.

and finally, something to remember the growing life inside of me. I never did a progressive belly shot with any of my kids and I thought it would be fun to do it with this one. This was taken at 17 weeks of pregnancy. We just started second trimester on this one so I had the energy to get myself looking 'somewhat' put together. :)

So there you have it. A post, that hopefully gets everyone updated on what's going on at the Tolman home. Know that we appreciate family and friend that check up on us through this blog and Facebook. We feel of your love and support. 

Till next time,
Grace