Everyone has a story to tell, here's mine sprinkled with some creative projects along the way.
Thank you for stopping by and I hope you come back again.


Saturday, January 29, 2011

This week.....

Happy Weekend everyone. This past week we had two small event to share....

First is Marcus' class performance. The entire 2nd graders performed during the school's assembly. Do you see how many kids there are? That's ALL of the 2nd graders in their elementary. I'm so happy that we belong to a school that has a smaller population.


The kids were singing songs about insects and Marcus decided to be a part of the "prey mantis" group.


We are proud of him and his participation with the group. He's a super shy kid so for him to stand there and attempt to sing is a big deal.


and then on Thursday Maddie attended her first day of Ballet/Tap/Jazz class.


My sister in law Lori recommended that I should look for a dance class for Maddie since she's staying home with me. I'm not sure if I've told this on the blog or not, but the school district here refused Maddie to continue K because her birthday was after their cut off date. Even if she was already going to K in California. We are saddened and a bit mad by their decision but we are hoping that it'll be for her own good to wait another year.


Anyways here she is with her teacher learning some tap steps.


There's only four girls in her class so it's a good size. There's enough time in the hour for the teacher to give each girl her attention and teaching.


And here's Maddie stretching a bit.

So that's how our week shaped up. We are slowly getting a routine going and it was fairly dry this week so we had a lot of fun enjoying our surroundings and the sun. Oh we've missed the sun!

Have a great weekend.

Till next time,
Grace

Wednesday, January 26, 2011

more 52 challenge layouts

Been cranking more layouts with the 52 more challenge book by Liz Kartchner in mind. Here are my most recent ones...

Fourth Birthday

this one is for the #15 Stick to a single color.

I used mostly pink which was a blessing cause I had a pack of paper that's filled with pink paper. I'm so happy when I get to use some of my older supplies. They're really not that old just ignored by me. :)
So as you can see, I had to add some sprinkling of green here. I'm taking this challenge as baby steps for me to get out of my comfort zone and if that means I can't really stand a monochromatic look just yet, then that's what it's going to be. *wink*

Learning from the Expert


this one is for the #23 Pair older product with new finds for a fresh look.

I used some "older" papers from SEI but added JBS journaling block and letter stickers to the mix. I'm really enjoying doing these challenges. Not only do they get me out of my comfort zone but they also give me a chance to work with some "ignored" but equally great products that I've pushed aside for the newer ones or for products I need to design with for publication and DT assignments.

and as for my attempt to make the most of my supplies, here's a couple of cards that went with the above layouts....

Good Friend


{Many Thanks}


Thanks for stopping by.

till next time,
Grace

Tuesday, January 25, 2011

Clear Scraps January Projects

hello and happy midweek.
Today I would like to share some January projects I made for Clear Scraps. As most of you know CHA is coming up (starting this weekend) and Clear Scraps have a lot of new things to be revealed in that trade show. Here's a couple of new products that I was fortunate to design with...

Inspirational words mini

In this book, I used the Butterfly mini album. This is a cute size, perfect for a brag book or an ornamental mini.


I'm into dry embossing my acrylic pieces lately. They add that perfect texture and flair. Here I used my Cuttlebug Swiss dot embossing folder and then painted the back side with yellow. I also ran my brown ink pad onto the embossed dots to make them stand out against the yellow paint too.


I was inspired to make this kind of album because I had a sticker sheet full of great inspirational quotes/phrases. I also added Cosmo Cricket papers and letter stickers to this mini.

My Aero Family

In this book, I used the new trifold rectangle frame. This is a cast acrylics which are thicker than the other acrylic pieces Clear Scraps offers. Although you can't run this pieces through your embossing folder, the hardness of the material makes it for a good, long lasting minibook foundation.


In this book, I documented my retail job experience with photos of my coworkers and what I learned from my work as a part time sales associate. I used Jenni Bowlin Studios circle journaling blocks, Webster's pages paper and Accent Creative Designs flowers. I also painted the back of the acrylic pieces with lavender to add some color without taking away for the clear aspect of the pieces.

So that's it. The new products are already available at the Clear Scraps online store. Make sure you check them all out. I have my favorites but I have to say, ALL OF THEM ARE PRETTY COOL!

Thanks for stopping by.

Till next time,
Grace

Our Saturday's excursion

So off we went again on Saturday to explore our new "home", Colorado. And this time we went to the Denver Temple and Downtown Denver. Here are some shots of our day trip.
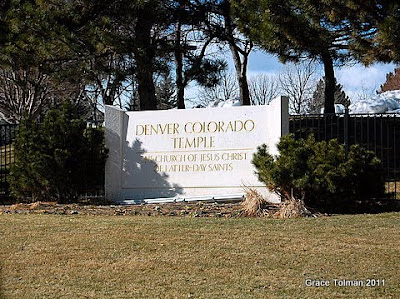

We went to the temple first because we wanted to gauge how far it will take us to get there. This will be helpful when we're planning to go do some sessions. So the result was it takes about 45 minutes from our house. Not bad, it's about the same travel time as when we were in Norwalk going to the LA temple.


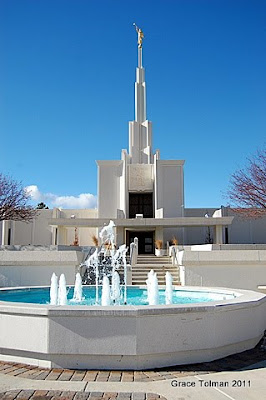
The temple is closed right now (for cleaning I think) and so we had the parking lot and the grounds all to ourselves.


It was a lovely day as you can see with the clear blue skies in the background. There was still snow on the ground and it was cold but the sun shining on the temple that day was beautiful.


a side shot.

After the Temple we headed to Downtown Denver.

Colorado Skyscrapers of course don't compare to Downtown LA buildings but it was great to see what "metropolitan" scenery is like here.

They have a block called 16th street that they turned it into a big shopping center and nobody can drive through this street except for a public bus that is free. We did most of our sightseeing through riding the bus.

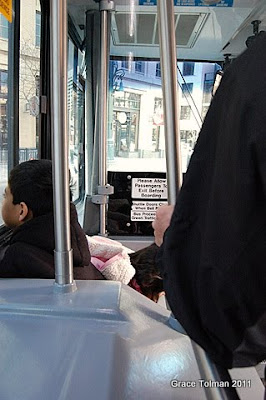
The kids' said that that was their favorite part of our trip. Marcus was so amazed that it was free, he kept saying "and it's free!" all day long.

We had lunch at a BBQ place.

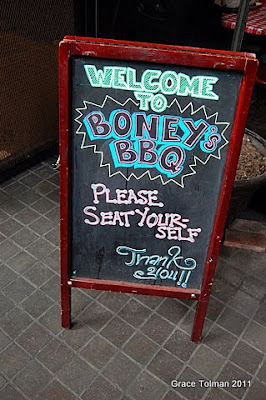
That's one thing I miss about California, there's a vast array of different cuisines. I also miss my brother Gary who directs me to the great places to eat. Luckily this one place that we tried had great food so it was not a waste. Their brisket and ribs was very delicious! Oh and their hush puppies was YUMMY too!


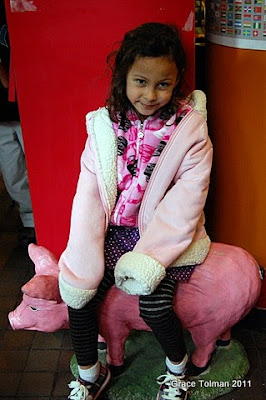
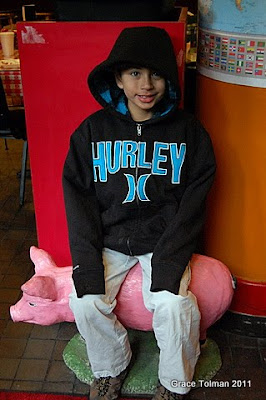
The kids had fun with this pig statue. All they wanted to do was sit on it though.


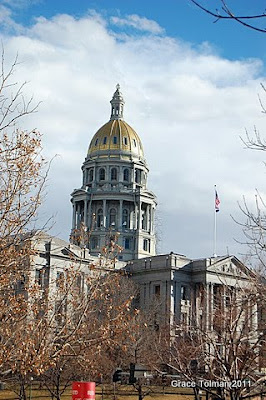
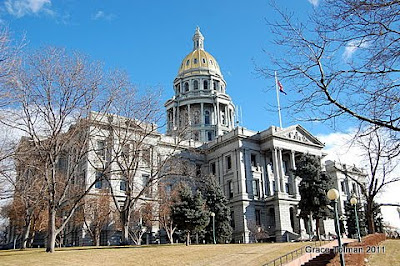
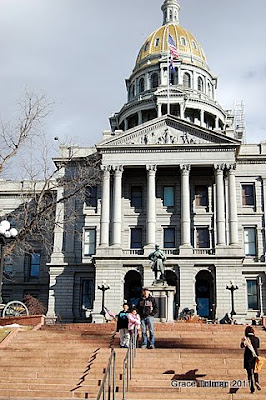
The bus takes you from one end of the 16th street to the other. On the west side was the Union Station and on the east side was the State Capital. I thought it was pretty neat to have seen it.


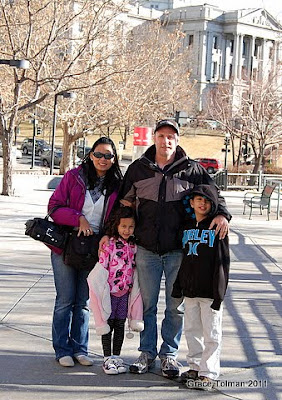
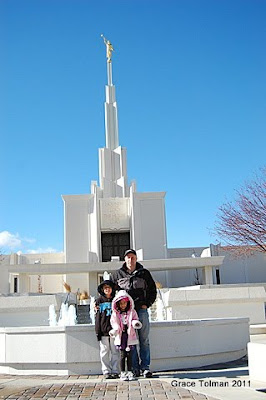
There was a nice man who was gracious enough to take a photo of our family together. I think he was very nice to offer although I was a little hesitant to give my camera to him. LOL

more shots of the capital building...


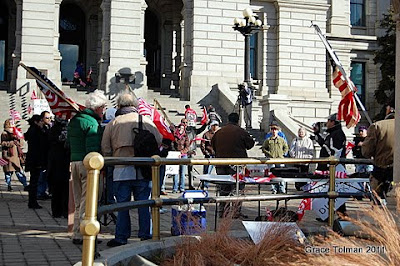
when we got up to the steps of the capital building, there were some protesters. They were talking about Tunisia. It was a bit strange to have Tunisian protesters in the Colorado Capital building. I'd assume they'd either directly go to Washington or the UN. But what do I know, right?!

The 16th street had some great shops that I wanted to look into but because I was with the family, shopping was not an option. Although Mitch let me look around Forever 21 for about 15 minutes before he was ready to get out of there. :) Sadly there's no F21 in my local mall. (what a bummer!)

We also went to the Rocky Mountain Chocolate Factory and bought a cheesecake covered apple. We had to split it with all four of us because of the whopping $8 price of just ONE apple. Expensive but oh so yummy!

After some touring and walking around, we headed home.


I took this photo because THIS IS what traffic looks like in Colorado. It's not bumper to bumper compared to LA. I'll take this kind any day and I definitely don't miss the traffic in California!

So that's it. Thanks for stopping by.

Till next time,
Grace

Thursday, January 20, 2011

DIY decorating project + a card

Happy Thursday everyone. Got a bit busy in the beginning of this week, running around town getting stuff for the house and shopping. Yes shopping is always fun. *wink* I made sure I filled up the beginning of this week with errands because yesterday afternoon it started snowing again here and you know me and snow. We don't see eye to eye very much and snow days always means "staying home days" for me.

Anyways enough of the blabbing...I'm here today to share with you a super easy and inexpensive way I brought some "ocean" theme to one of our bathrooms.


I want to be reminded of California once in a while and what better way to do this than to display some sea shells.


I say this is an inexpensive DIY project because I only spent $5 on this. I've had the glass jar for a while and was actually using it as a container for my wood stamp before but my Aunt Eloisa gave me her beautiful shell collection and I thought it would be the perfect container to house the shells.
The only I bought here are the stones that I put on the bottom of the jar, something to mimic the shore and also to give the shells a little lift. If you're interested, I got the stones at the garden section of my local Home Depot.


Now this sea shell jar sits on top of the kids' bathroom. I feel like it matches the distressed effect of the cabinets too. Don't you think?

and to finish off this post, let me share a card I recently made with scraps. I made this after I accomplished another challenge in the 52 more challenges book. I can't share the page right now because it has some of our friends there and I don't feel comfortable sharing other people's kids' in my blog. Just to be on the safe side, you know!

Anyways here's the card...


I used a bunch of squares on the layout and since I had some leftover, that drove the design of this card.


I have a few of these tiny flowers with stems and thought of breaking open the package and adding some here. I think they add that soft touch to the card.

So that's it. Thanks for stopping by.

Till next time,
Grace

Monday, January 17, 2011

52 scrapbooking challenges

Hello Monday. I'm sure a lot of moms out there are grateful that it's a holiday today. One extra day that we can sleep in. Woohoo for that!

Anyways, one of the things that I made a goal for this year is to go back to challenges. I LOVE challenges. I love how it helps me break out of my comfort zone, trying new things/techniques and just makes scrapbooking fun and less boring for me.

Late last year, I borrowed this book from the library....


I've always loved Elizabeth Kartchner's style. She has the ability to combine fun and whimsy with great stories and photos plus always having that extra special technique or touch that always wows me. So it was no surprise that I decided to jump onto her challenges.
I know I'm probably super late here, being that her book has been out for over a year now. But that doesn't bother me. I feel like inspiration doesn't have to follow trends and since lately my word is "catching up", following this book's challenges just suits my life right now.

Ok so I wanna goal myself to at least do one challenge a week. I'm not going to stress if there's week's where I can't do one and I'll whip up two or three on those weeks that I do have a lot more spare time.

So for my first try...I did #20 Use a grid as the basis for a page design.

Farmer's Market

I decided to go with a double page spread here. I had a ton of photos and putting them into a grid really made for an easy, well balanced page.


I added the title block with dimensional adhesive to make it stand out better against the background.


Another thing I wanted to do with this challenge is to be able to use up some old products. The journaling block and chipboard circle I used here is from Scenic Route.


I rummaged through my stickers and found these gems from an October Afternoon sheet and also from a sheet from Making Memories.

and to go along with my need to use up what I have, I made a card using scraps from the page above...

My Friend

I used up the scallop stickers from the Carolee's Creations sheet, the sentiment sticker from the OA sheet and added the felt bird that I've had FOREVER!

So that's it. I made a couple more last week and I'll share those with you soon. Thanks for stopping by.

Till next time,
Grace

Friday, January 14, 2011

DIY framed art

Thank goodness it's Friday!

As most of you know, I recently moved. With this new adventure, one of the challenges I've come across with is how to design my home in a way where it shows my family's personality but without spending way too much money.

We kind of upgraded with the house and so the stuff that we brought with us does not fill up the entire home. I'm not saying that I want it to be fully furnished right away but there are some walls that are so bare, I can't stand it!

So with that being said, I turned to what I know best....crafting....for help in this area. Starting with this post and more to follow (hopefully not to far apart from each other) I'll share what I've done to bring some "paper love" into my home and maybe you can gather some ideas for your own abode.

I consider myself a "jack of all trades, master of none" because I really do dive into many crafts but I don't stay too long with the craft to actually consider myself an "advance" in that field. One of the things I used to do is Cross stitching. My mother taught me how to cross stitch and when I had my first child, in the first three months of being a stay at home mom, I cross stitched to pass the time.

I did three small projects, promised myself that I will eventually get it framed, placed it in a bag in my "craft" plastic tub and forgot about them!

But after moving, I knew I had to bring them out from their hiding. So I got some old frames, some pattern papers and framed them myself.....


For some reason, when we moved there were a TON of frames without photos that popped out from one box. I think Mitch was hiding these frames all this time. LOL.


I tried to match the pattern papers to the cross stitch designs so they'll blend together. This Pooh one was the first one I framed. I measured the finished CS design and cut out a frame from the pattern paper so the CS will be behind the paper.


I made this one for Marcus and I used little birdie paper to match the "baby" theme in the CS design.


In this one, I used a red pattern paper to bring out the red in the Statue of Liberty design.


As you can see, I'm not an expert in framing nor do I like to take my "sweet" time to make anything like this elaborate. I felt like the pattern paper and framing itself just needs to enhance the CS design. After all, that's why I'm framing them, right?!

So that's my share today. Easy DIY framing that can be done in minutes and costs next to nothing.

I hope you guys have a great weekend and thanks for stopping.

Till next time,
Grace

Thursday, January 13, 2011

My 2011 Vision

happy Thursday. First off, thanks to all that visited my blog yesterday for the Clear Scraps blog hop. Wasn't that fun? I'm so blessed to be a part of such a talented team.

Anyways today I want to share my 2011 vision. Back in 2008, I read an article in Creating Keepsakes about Mantras. I was so inspired by it that ever since then, I'd create a framed art of the word that will remind me of what I'm trying to achieve that year. Here's a look at my past visions....

2008


2009


2010


as you can see, I just reuse the same frame every time. There's no reason to make new ones every year (that'll be alot of frames!)

My visions are usually dictated by how I'm feeling at the beginning of each year. The phrases/sentences or words that I use reflect what I've done the previous year and what I'm feeling my thoughts should be for that coming year.

So with that being said let me share with you what I want my life to be this year.....


Here's my 2011 Vision....being PROACTIVE!


It got me thinking about this because of this great quote (that I even added to my frame).

Since we are in a new place, not knowing much people, being proactive is very fitting for me. I can't wait for people to talk or introduce themselves to me. I have to do it myself, if I want to get to know people and maybe gain friends along the way too.

I also thought about this in my scrapbook "career". Or should I say, If I want to have a career out of what I love to do, I need to stop being scared and just start putting myself out there. I need to stop being afraid of rejection and just GO FOR IT!

So that's my goal this year.....to GO FOR IT! I figured there's nobody out there that can make things happen for me better than myself.

Thanks for letting me share and goodluck to all of us that have goals/resolutions/plans this year. May we all be successful in it. Cheers!

Till next time,
Grace